
Getting your new DEWALT power tools ready for use can seem straightforward, but proper setup is crucial for safety, efficiency, and longevity. Whether you’re a seasoned DIYer or a first-time user, this guide provides clear, practical steps to assemble and configure your DEWALT tools correctly. Following these guidelines helps prevent accidents, enhances tool performance, and ensures you get the most out of your investment.

Get garden gear delivered free with Prime
- Fast, free delivery on millions of items
- Prime Video, Amazon Music and more included
- Member-only deals all year
We’ll focus on the popular DEWALT 20V MAX Cordless Drill Driver Set, along with helpful tips on accessories like drill bits and batteries. Safety precautions and troubleshooting tips are also included to make your setup smooth and secure.
Key Takeaways
| Proper assembly prevents accidents | Ensure all components are correctly fitted and tightened. |
| Battery safety is key | Use compatible batteries and avoid exposing them to extreme conditions. |
| Use the right accessories | Select appropriate drill bits for your material to optimize performance. |
| Test before use | Operate the tool briefly to confirm proper setup and functionality. |
| Maintain safety gear | Always wear safety glasses and gloves when assembling or operating. |
Unboxing and Initial Inspection
- Carefully remove the DEWALT 20V MAX Cordless Drill Driver Set from its packaging. Check all included components: the drill, battery, charger, and accessories.
- Inspect each part for any visible damage or defects. Confirm that the battery is fully charged or has sufficient charge before starting assembly.
- Read the user manual thoroughly to familiarize yourself with the tool’s features and safety instructions.
Assembling the Drill and Attaching the Battery
- Hold the drill firmly and locate the battery compartment at the base of the handle.
- Align the battery (model DCB205-2 for the 5Ah version) with the contacts and slide it into the compartment until it clicks securely into place.
- To remove, press the release button and pull the battery out. Ensure the battery is properly seated before use.
Installing and Using Drill Bits
- Choose a compatible drill bit suited for your task (see recommended DEWALT drill bit set for various materials).
- Loosen the single-sleeve ratcheting chuck by rotating it counterclockwise.
- Insert the shank of your drill bit into the chuck, ensuring it is centered and fully inserted.
- Hand-tighten the chuck by rotating it clockwise, then tighten further using the chuck key if your model has one.
- Test the bit by running the drill briefly to ensure it is secure and operates smoothly.
Powering On and Adjusting Settings
- Press and hold the trigger to turn on the drill. The LED light will activate, illuminating your work area.
- Adjust the two-speed transmission (low or high) according to your task. Use the speed switch or trigger pressure for variable speed control.
- Set torque limits if your model has adjustable torque settings, especially for fastening tasks.
- Test the operation on a scrap piece to confirm proper setup.
Safety Tips During Setup and Use
- Always wear safety glasses to protect your eyes from debris.
- Keep your hands away from the drill bit during operation.
- Ensure the work area is clean and free of obstructions.
- Do not force the drill; let it work at its own pace to prevent bit breakage or accidents.
- Disconnect the battery when changing bits or performing maintenance.
Troubleshooting Common Issues
- If the drill doesn’t turn on, check if the battery is properly seated and charged.
- For weak performance, ensure the battery isn’t depleted and that the bit is suitable for the material.
- If the chuck is slipping, tighten it securely or replace the chuck if worn.
- Clean contact points and check for debris if the LED light or electronics malfunction.
The Products in This Guide

DEWALT 20V MAX Cordless Drill Driver Set
- ✔ Voltage: 20V MAX
- ✔ Battery Capacity: 2.0 Ah
- ✔ Chuck Size: 1/2 inch
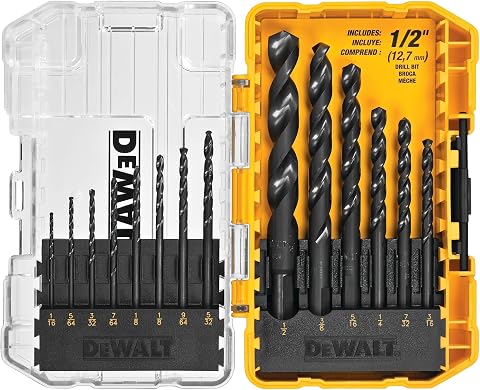
DEWALT Drill Bit Set
- ✔ Number of Bits: 14
- ✔ Tip Design: Split point
- ✔ Shank Type: 3-flats
DEWALT 20V MAX Cordless Drill Driver Set
The DEWALT 20V MAX Cordless Drill Driver Set is a powerful and compact tool perfect for a wide range of applications. Its brushless motor delivers more runtime, and the lightweight design makes it easy to operate in tight spaces. The included 2.0 Ah battery and charger ensure you’re ready to work immediately. Proper setup and safety practices will maximize its lifespan and your productivity.
Pros:
- Brushless motor for longer runtime
- Compact and lightweight design
- Two-speed transmission for versatility
- LED work light for visibility
Cons:
- Battery life may vary with heavy use
- No additional chuck sizes included
- Requires careful handling of batteries
Best for: DIY projects, home repairs, light construction work
Not ideal for: Heavy-duty industrial use or prolonged continuous operation
Bottom line: A versatile and reliable cordless drill that balances power and portability.
DEWALT Drill Bit Set
Pair your DEWALT drill with this 14-piece drill bit set featuring 135-degree split points and high-speed steel construction. It’s designed to reduce walking and resist breakage, making it ideal for various drilling tasks in plastic, wood, and metal.
Pros:
- Durable high-speed steel
- Split point for precision
- Corrosion-resistant coating
- Includes a variety of sizes
Cons:
- Limited to 14 bits
- No carrying case included
- Requires separate storage
Best for: General-purpose drilling, DIY projects, metalwork
Not ideal for: Heavy industrial use or specialized high-torque applications
Bottom line: A versatile drill bit set that complements your DEWALT drill perfectly.
Frequently Asked Questions
How do I safely change the battery in my DEWALT drill?
Press the battery release button at the base of the handle and slide the battery out. Always turn off the drill before removing or inserting a battery to prevent accidental activation.
What should I do if my drill isn’t turning on?
First, check that the battery is fully charged and properly seated. If it still doesn’t turn on, inspect for any damage or loose connections, and try a different battery if available.
How can I extend the lifespan of my drill bits?
Use the correct bit for your material, avoid excessive force, and store bits in a dry, organized case to prevent rust and damage.
Is it safe to operate the drill in tight spaces?
Yes, the compact design and lightweight construction of the DEWALT drill make it suitable for tight areas. Always ensure you have a firm grip and wear safety gear.
Can I use this drill for heavy-duty projects?
While the DEWALT 20V MAX is versatile for many tasks, it’s best suited for general-purpose drilling and fastening. For heavy industrial use, consider more specialized equipment.
Getting Started with Confidence
Setting up your DEWALT power tools correctly is essential for safe and efficient operation. By following the step-by-step instructions and safety tips provided, you can ensure your tools perform optimally and last longer. Remember to regularly inspect your equipment, keep it clean, and use compatible accessories to maximize your investment and achieve professional results.
With your setup complete, you’re ready to tackle a wide range of projects with confidence. Happy drilling!
Affiliate disclosure: As an Amazon Associate we earn from qualifying purchases. Prices and availability are accurate as of the time of publishing.
Columbus Day / Indigenous Peoples' Day Picks
long weekend sales
As an affiliate, we earn on qualifying purchases.